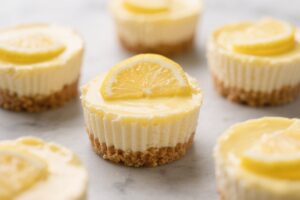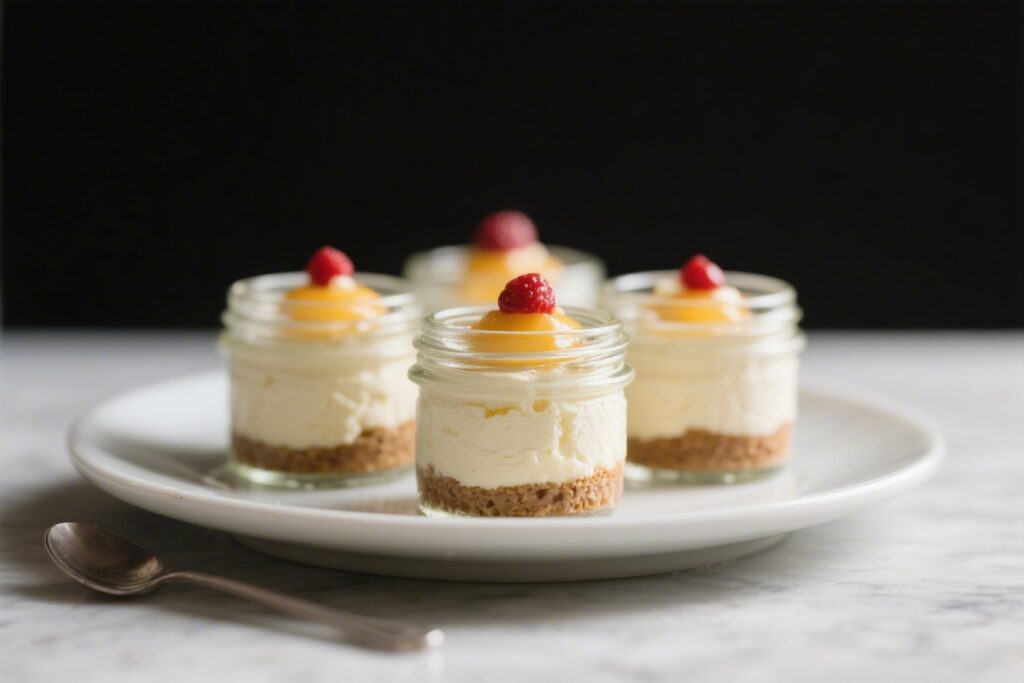
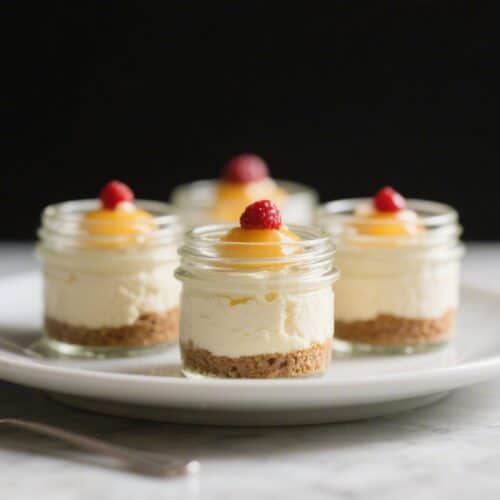
These mini no bake cheesecake jars are the kind of dessert you make when you want something special without turning on the oven. The filling is silky, lightly sweet, and perfectly tangy. The crust is buttery and crunchy, and the toppings are totally up to you.
They’re great for parties, make-ahead desserts, or just a treat after dinner. Best of all, they assemble quickly and chill while you get on with your day.
What Makes This Recipe So Good
- No oven needed: This is a simple, no-fuss dessert that sets in the fridge.
- Perfectly portioned: Individual jars are cute, tidy, and easy to serve.
- Balanced flavor: Creamy filling with a hint of lemon for freshness, plus a buttery crust.
- Flexible toppings: Fresh fruit, sauces, or crushed candy—customize for any season.
- Make-ahead friendly: They hold up beautifully in the fridge for a few days.
- Beginner-friendly: No fancy equipment or techniques required.
Recipe Cards
Mini No Bake Cheesecake Jars
Ingredients
For the crust:
- 1 1/2 cups graham cracker crumbs (about 12 full sheets), or digestive biscuits
- 6 tablespoons unsalted butter, melted
- 2 tablespoons granulated sugar (optional, for a sweeter crust)
- Pinch of fine salt
For the cheesecake filling:
- 12 ounces cream cheese, softened to room temperature
- 1/2 cup powdered sugar
- 1 teaspoon pure vanilla extract
- 1 tablespoon fresh lemon juice
- 1 teaspoon lemon zest (optional but recommended)
- 1 cup cold heavy whipping cream
- Pinch of salt
For topping (choose your favorites):
- Fresh berries (strawberries, blueberries, raspberries)
- Fruit compote or pie filling
- Salted caramel or chocolate sauce
- Crushed cookies, nuts, or shaved chocolate
- Lemon curd or passion fruit pulp
Equipment:
- 6–8 small jars or glasses (4–6 ounces each)
- Hand mixer or stand mixer
- Mixing bowls and spatula
Instructions
- Make the crust: In a bowl, stir graham cracker crumbs, melted butter, sugar (if using), and a pinch of salt until the mixture looks like wet sand and holds together when pressed.
- Pack the base: Spoon 2–3 tablespoons of crust mixture into each jar. Press down firmly with the back of a spoon or a small glass. Set aside.
- Beat the cream cheese: In a large bowl, beat softened cream cheese until smooth and fluffy, about 1–2 minutes. Scrape the bowl.
- Sweeten and flavor: Add powdered sugar, vanilla, lemon juice, and zest. Beat until well combined and silky. Taste and adjust sweetness or lemon to your liking.
- Whip the cream: In a separate bowl, whip cold heavy cream with a pinch of salt to stiff peaks. Don’t overwhip.
- Fold gently: Add one-third of the whipped cream to the cream cheese mixture and fold to lighten. Fold in the remaining whipped cream until no streaks remain.
- Fill the jars: Pipe or spoon the cheesecake filling over the crusts, leaving space for toppings. Smooth the tops.
- Chill: Cover and refrigerate for at least 3 hours, or up to overnight, until set and spoonable.
- Add toppings: Just before serving, add berries, compote, sauce, or your favorite toppings. Serve cold.
Keeping It Fresh
- Storage: Cover jars tightly and keep in the fridge for up to 4 days. Hold off on fresh fruit toppings until serving to avoid weeping.
- Freezing: You can freeze the assembled jars (without fresh fruit) for up to 1 month.
Thaw in the fridge overnight, then add toppings.
- Transport: If you’re taking them to a party, pack the jars in a cooler and add toppings on site for the neatest look.
Health Benefits
- Portion control: Individual jars help you enjoy dessert without overdoing it.
- Protein and calcium: Cream cheese and heavy cream supply some protein and calcium for bone health.
- Fresh fruit option: Choosing berries or citrus curd adds antioxidants and vitamin C, especially compared to candy or heavy sauces.
- Customizable sweetness: You can reduce sugar in the crust or filling, or swap in a stevia–powdered sugar blend to cut added sugar.
- Gluten-free swap: Use gluten-free cookies or nut crumbs for the crust to fit dietary needs.
Common Mistakes to Avoid
- Using cold cream cheese: If it’s not softened, the filling turns lumpy. Let it sit at room temperature for 30–60 minutes.
- Overwhipping the cream: Whipped cream can split and get grainy. Stop at stiff peaks.
- Skipping the chill time: The mixture needs time to set.
Aim for at least 3 hours for a clean, creamy texture.
- Wet or soggy crust: Don’t overdo the butter. The crumb should be moist but not greasy. Press firmly to help it hold.
- Overloading toppings: Heavy or watery toppings can sink in or make the surface messy.
Add them just before serving.
Variations You Can Try
- Chocolate lovers: Add 2 tablespoons cocoa powder and 2 more tablespoons powdered sugar to the filling. Top with shaved chocolate and fudge sauce.
- Strawberry shortcake: Use crushed shortbread for the crust, layer with macerated strawberries, and finish with whipped cream.
- Lemon blueberry: Keep the lemon zest and juice, swirl in lemon curd, and top with fresh blueberries.
- Salted caramel pretzel: Swap part of the crumbs with crushed pretzels. Drizzle with caramel and a sprinkle of flaky salt.
- Tropical twist: Use coconut cookies for the crust, fold a few tablespoons of coconut cream into the filling, and top with mango and toasted coconut.
- Protein boost: Blend 2–3 tablespoons vanilla Greek yogurt into the filling and reduce the whipped cream slightly to keep the texture thick.
- Gluten-free and lower sugar: Use almond flour and a touch of melted butter for the crust, sweeten the filling lightly, and top with fresh berries.
FAQ
Can I make these a day ahead?
Yes.
In fact, they’re even better the next day because the flavors meld and the texture firms up. Add fresh fruit just before serving.
What jars should I use?
Small 4–6 ounce mason jars or sturdy dessert glasses work best. Aim for something with a wide mouth to make layering and eating easier.
Can I use store-bought whipped topping?
You can.
Use about 2 to 2 1/2 cups, folded into the cream cheese mixture. The flavor and texture will be a bit sweeter and lighter.
How do I make them less sweet?
Reduce powdered sugar to 1/3 cup and skip sugar in the crust. Choose fruit toppings over caramel or chocolate.
Can I use low-fat cream cheese?
You can use Neufchâtel or light cream cheese, but the texture will be softer.
Chill a little longer and avoid heavy, wet toppings.
What if I don’t have a mixer?
Soften the cream cheese well and beat vigorously with a sturdy whisk. It takes more effort, but it works.
Why is my filling runny?
Likely causes are under-whipped cream, warm filling, or too much lemon juice. Whip cream to stiff peaks, measure lemon juice carefully, and chill longer.
Is there a nut-free option for the crust?
Yes.
Standard graham crackers or digestive biscuits are typically nut-free. Always check labels if allergies are a concern.
How many jars does this recipe make?
It makes about 6–8 small jars, depending on the size and how generously you fill them.
Can I add gelatin to make it firmer?
Yes. Bloom 1 teaspoon powdered gelatin in 1 tablespoon cold water, warm gently until dissolved, cool slightly, and mix into the cream cheese base before folding in the whipped cream.
Wrapping Up
Mini no bake cheesecake jars are simple to assemble, easy to customize, and always a hit.
With a buttery crust, creamy filling, and a world of topping options, they fit any occasion. Make them ahead, keep them chilled, and pull them out when you want a dessert that feels special without the stress. Once you try them, they’ll become your go-to sweet for dinners, parties, or just because.