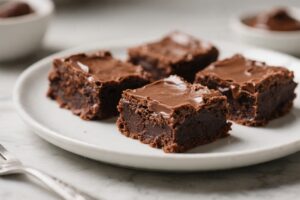
If you love a brownie with a glossy top, a deep chocolate flavor, and a chewy center, this traybake is your new go-to. It’s simple to make, bakes in one pan, and feeds a crowd without fuss. No special tools, no tricky steps—just classic brownies done right.
Whether you’re baking for a birthday, a bake sale, or a quiet night in, this recipe delivers. Expect gooey squares with crisp edges and that signature fudgy bite.
Why This Recipe Works
This brownie strikes the sweet spot between gooey and set. Melted butter and chocolate give it a rich, fudgy texture, while a little oil keeps it soft for days.
A mix of white and brown sugar adds both shine on top and moisture inside. The eggs are whisked until thick to create that classic crackly crust. Finally, a small amount of flour and cocoa powder balances structure with chocolate intensity.
Ingredients
- 200 g (7 oz) dark chocolate (60–70% cocoa), chopped
- 115 g (1/2 cup) unsalted butter
- 2 tbsp neutral oil (such as sunflower or canola)
- 150 g (3/4 cup) granulated sugar
- 100 g (1/2 cup) light brown sugar
- 3 large eggs, at room temperature
- 2 tsp vanilla extract
- 90 g (3/4 cup) plain/all-purpose flour
- 30 g (1/4 cup) cocoa powder (unsweetened, Dutch or natural)
- 1/2 tsp fine salt
- Optional mix-ins: 100 g (3.5 oz) dark chocolate chips or chunks, 60 g (1/2 cup) chopped walnuts or pecans
- Equipment: 9×13-inch (23×33 cm) baking tray, baking parchment, whisk, heatproof bowl
Instructions
- Prep the pan and oven. Heat the oven to 175°C/350°F.Line a 9×13-inch tray with parchment, letting it overhang for easy lifting. Lightly grease the parchment.
- Melt chocolate and butter. In a heatproof bowl, melt the dark chocolate and butter together over a pot of barely simmering water, or in short microwave bursts. Stir until smooth, then whisk in the oil.Let it cool for 5 minutes.
- Whisk the sugars and eggs. In a large bowl, whisk the granulated sugar, brown sugar, and eggs for 1–2 minutes until slightly thick and glossy. Whisk in the vanilla. This helps build that crackly top.
- Combine chocolate and egg mixture. Slowly pour the warm chocolate mixture into the egg mixture while whisking.Mix until fully combined and shiny.
- Fold in dry ingredients. Sift in the flour, cocoa powder, and salt. Use a spatula to fold gently until you no longer see dry streaks. Don’t overmix.
- Add mix-ins. Fold in chocolate chips and/or nuts if using.Keep a few chips for sprinkling on top.
- Spread and bake. Pour the batter into the lined tray and smooth the top. Sprinkle remaining chips. Bake for 22–28 minutes, or until the edges are set and a skewer inserted into the center comes out with moist crumbs (not wet batter).
- Cool completely. Let the tray cool on a rack for at least 1 hour.For the cleanest slices and maximum fudginess, chill for 30 minutes before cutting.
- Slice and serve. Use the parchment to lift the slab out. Cut into 20–24 squares. Enjoy as-is, or warm slightly and serve with ice cream.
How to Store
- Room temperature: Keep in an airtight container for 3–4 days.Slip in a slice of bread to help retain moisture.
- Fridge: Store up to 1 week. The texture will be firmer and extra fudgy. Bring to room temp before serving for the best flavor.
- Freezer: Wrap individual squares and freeze for up to 2 months.Thaw at room temp for 1 hour or microwave in 10–15 second bursts.
Why This is Good for You
This is a treat, but it has a few small wins. Dark chocolate contains antioxidants, and using a bit of oil with butter keeps the texture satisfying, so a small square feels indulgent. The strong cocoa flavor also means you don’t need a massive piece to feel satisfied.
Pairing a brownie with fresh berries or a handful of nuts adds fiber and healthy fats to round it out.
What Not to Do
- Don’t overbake. If you wait for a clean skewer, your brownies will be dry. Pull them when there are moist crumbs clinging to the tester.
- Don’t skip cooling time. Cutting too soon leads to messy slices and a gummy texture. Cooling lets the crumb set.
- Don’t overmix the flour. Vigorous stirring after adding flour can make brownies cakey.Fold gently just until combined.
- Don’t use low-quality chocolate. The flavor hinges on the chocolate. Choose a bar you enjoy eating on its own.
- Don’t bake in a dark, unlined pan without adjusting. Dark pans run hot and can overbrown edges. Line with parchment, or check for doneness a few minutes early.
Variations You Can Try
- Salted Caramel Swirl: Dollop 6–8 teaspoons of thick caramel over the batter and swirl lightly.Sprinkle with flaky salt before baking.
- Mocha Brownies: Add 2 tsp instant espresso powder with the cocoa to boost chocolate depth and add a coffee note.
- Peanut Butter Ripple: Warm 1/3 cup peanut butter until loose. Swirl into the top layer of batter, then bake.
- Mint Chocolate: Stir in 1/2 tsp peppermint extract and swap half the chips for chopped mint chocolate.
- Gluten-Free: Use a 1:1 gluten-free all-purpose blend. Add 1 extra tablespoon of cocoa if the blend seems starchy.
- Extra Chunky: Fold in a mix of chopped milk, dark, and white chocolate for texture and pockets of melt.
- Nutty Crunch: Toast walnuts or pecans first for deeper flavor, then fold in 2/3 cup.
FAQ
How do I know when the brownies are done?
Look for set edges, a glossy, slightly crackled top, and a center that doesn’t jiggle when you nudge the pan.
A skewer should come out with moist, fudgy crumbs, not a clean tip. Start checking at 22 minutes and watch closely.
Can I halve the recipe?
Yes. Bake in an 8×8-inch pan and start checking at 20 minutes.
The brownies will be a bit thicker, so you may need a couple of extra minutes depending on your oven.
What if I only have cocoa and no chocolate?
You can make cocoa-only brownies, but they’ll be less fudgy and rich. If you must, increase butter to 170 g (3/4 cup) and add an extra 2 tablespoons of oil, plus 30 g (1/4 cup) more sugar. Flavor will differ from the original.
Why didn’t I get a crackly top?
That shiny crust comes from properly dissolving sugar and whisking the eggs with the sugars until slightly thick.
Also, avoid adding extra flour and don’t overmix after the dry ingredients go in. Using real chopped chocolate helps too.
Can I make this dairy-free?
Yes. Use a good dairy-free dark chocolate and swap butter for a plant-based block butter (not a soft spread).
Keep the oil for moisture. Texture will still be fudgy if baked correctly.
How do I get clean slices?
Chill the tray for 30–60 minutes after cooling, then use a long, sharp knife. Wipe the blade between cuts.
The extra chill time sets the fudge and keeps edges neat.
Can I add fruit?
Yes, but choose low-moisture add-ins like dried cherries or freeze-dried raspberries. Fresh fruit can release water and make the brownies gummy. If using dried fruit, soak briefly in hot water, drain, and pat dry before folding in.
What’s the best cocoa to use?
Use a quality unsweetened cocoa.
Dutch-processed gives a smoother, darker flavor; natural cocoa offers a brighter chocolate note. Either works well here.
Do I need a stand mixer?
No. A hand whisk is enough.
The key is a good 1–2 minute whisk of the eggs and sugars to get some volume and dissolve the sugar.
Why did my brownies sink in the middle?
That can happen if the batter was overmixed, the oven door was opened early, or they were underbaked. It’s not always a bad sign—sinking often means extra fudgy centers. Next time, bake a few minutes longer and avoid peeking too soon.
Final Thoughts
This Chocolate Fudge Brownie Traybake is simple, reliable, and rich enough to please any chocolate fan.
With a few smart steps—good chocolate, gentle folding, and the right bake time—you’ll get glossy-topped, chewy-centered squares every time. Keep a batch on hand for easy sharing, or slice and freeze for future cravings. It’s the kind of recipe you’ll make once and then keep in your back pocket forever.