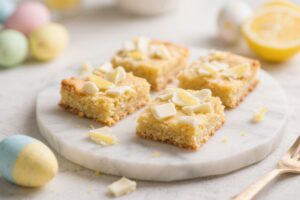
A Cherry Bakewell Traybake brings all the charm of a traditional Bakewell tart without the fuss. You get a tender almond sponge, a layer of sweet jam, and a smooth icing finish dotted with bright glacé cherries. It’s easy to slice, easy to serve, and perfect for sharing at work, school events, or weekend treats.
If you like almond and cherry together, this is a bake you’ll make again and again. The best part? It keeps well and tastes even better the next day.
Why This Recipe Works
This traybake keeps things straightforward: a simple all-in-one sponge enriched with ground almonds for moistness and flavor.
The jam layer brings sweetness and a pop of fruit that cuts through the richness. A quick, glossy icing seals in moisture and gives that classic Bakewell look. Because it’s baked in a tin, you avoid the fuss of pastry and crimping.
It’s reliable, scalable, and easy to customize with different jams or nuts.
Ingredients
- Unsalted butter (softened) – about 225 g (1 cup)
- Caster sugar (or granulated) – 225 g (1 cup)
- Large eggs – 4
- Self-raising flour – 225 g (about 1 3/4 cups), or use plain flour plus baking powder
- Ground almonds – 100 g (about 1 cup)
- Almond extract – 1–1.5 teaspoons, to taste
- Salt – a pinch
- Milk – 2–3 tablespoons, as needed for batter consistency
- Raspberry jam (or cherry jam) – 200–250 g (about 3/4–1 cup)
- Icing sugar (powdered sugar) – 250–300 g (about 2–2 1/2 cups)
- Fresh lemon juice or water – 2–3 tablespoons, for icing
- Glacé cherries – about 10–12, halved
- Flaked almonds (optional) – a small handful, lightly toasted
- Butter or oil and parchment paper for lining the tin
Instructions
- Prep the tin and oven. Heat the oven to 180°C/160°C fan/350°F. Line a 9×13-inch (23×33 cm) baking tin with parchment, leaving overhang for easy lifting. Lightly grease the sides.
- Cream butter and sugar. In a large bowl, beat softened butter and caster sugar until pale and fluffy, about 2–3 minutes.This traps air and helps the sponge rise.
- Add eggs and almond extract. Beat in the eggs one at a time. Add the almond extract. If the mixture looks curdled, add a spoonful of flour to bring it back together.
- Fold in dry ingredients. Sift in self-raising flour and a pinch of salt, then add the ground almonds.Fold gently until combined. Add 2–3 tablespoons of milk to loosen to a soft, dropping consistency.
- Spread the batter. Spoon the batter into the lined tin and level the top with an offset spatula. Aim for an even layer.
- Swirl in the jam. Warm the jam slightly if it’s very thick, then dollop small spoonfuls across the surface.Use a knife to swirl it lightly through the top third of the batter. Don’t overmix—you want visible ribbons.
- Bake. Place the tin in the center of the oven and bake for 25–35 minutes, until golden and springy. A skewer should come out mostly clean, avoiding jam pockets.
- Cool completely. Leave the traybake in the tin for 10 minutes, then lift out using the parchment and cool fully on a rack. Icing on a warm cake will melt and slide, so patience pays off.
- Make the icing. Sift icing sugar into a bowl.Add lemon juice or water a little at a time, whisking to a thick, pourable glaze. You’re looking for a consistency that slowly ribbons off the spoon. Too thin? Add more icing sugar. Too thick? Add drops of liquid.
- Ice and decorate. Pour the icing over the cooled sponge and nudge it to the edges. While still wet, dot halved glacé cherries across the surface and scatter toasted flaked almonds if using.Let the icing set for at least 30–45 minutes.
- Slice and serve. Use a sharp knife, wiped clean between cuts, to slice into 16–20 squares. Serve at room temperature.
How to Store
Room temperature: Store slices in an airtight container for up to 3–4 days. The icing helps seal in moisture, so it stays tender.
Keep out of direct sun or heat.
Freezer: Freeze individual slices (without fresh fruit toppings) well wrapped for up to 2 months. Thaw at room temperature, uncovered, to keep the icing from going tacky.
Fridge: Not essential, and can dry the sponge. If your kitchen is hot, refrigerate in an airtight box and let it come to room temp before serving.
Benefits of This Recipe
- Fuss-free format: No pastry, no blind baking—just mix, bake, and ice.
- Moist and flavorful: Ground almonds keep the crumb soft and add rich, nutty depth.
- Great for sharing: A traybake slices neatly for parties, bakes sales, or lunchboxes.
- Customizable: Swap jams, tweak the icing flavor, or add flaked almonds for crunch.
- Make-ahead friendly: Stays good for several days and freezes well.
Pitfalls to Watch Out For
- Overmixing the batter: This can toughen the crumb.Fold gently once the flour goes in.
- Overbaking: Watch the last 5 minutes closely. Take it out as soon as the center springs back.
- Too-thin icing: Runny icing won’t set well. Aim for a thick, glossy glaze that holds its shape briefly.
- Adding too much jam: It can sink or make soggy patches.Stick to light swirls and avoid layering it thickly in the middle.
- Icing a warm cake: The glaze will melt and slide off. Cool completely first.
Alternatives
- Different jams: Try cherry, strawberry, apricot, or blackberry. Tart raspberry is classic for contrast.
- Orange or lemon twist: Add 1–2 teaspoons of citrus zest to the batter and use citrus juice in the icing.
- Nut-free version: Replace ground almonds with the same weight of flour plus 1 tablespoon milk.Flavor with vanilla instead of almond extract.
- Gluten-free: Use a 1:1 gluten-free flour blend with xanthan gum, and ensure your baking powder is gluten-free. Ground almonds work well here for moisture.
- Chocolate cherry: Fold 75 g (1/2 cup) mini chocolate chips into the batter and use cherry jam; finish with a cocoa-tinged icing.
- Marzipan layer: For a more traditional Bakewell vibe, roll a thin sheet of marzipan and lay it over the cooled sponge before icing.
FAQ
Can I use plain flour instead of self-raising flour?
Yes. Use plain (all-purpose) flour and add 2 teaspoons of baking powder per 225 g (1 3/4 cups) flour.
Include a pinch of salt as well.
What size tin works best?
A 9×13-inch (23×33 cm) tin gives a good thickness and even bake. If using a smaller tin, extend the bake time slightly. For larger tins, the sponge will be thinner and bake faster.
How do I know when the sponge is done?
The top should be golden and spring back when lightly pressed.
A skewer inserted into the sponge (avoiding jam) should come out clean or with a few moist crumbs.
Is almond extract essential?
It’s key to the classic Bakewell taste. If you don’t have it or prefer a milder flavor, use vanilla extract and rely on the ground almonds for nuttiness.
Why did my icing crack when slicing?
Thick, well-set icing can crack. Use a sharp, warmed knife and wipe it clean between cuts.
You can also slice before the icing fully hardens for cleaner edges.
Can I make it the day before?
Absolutely. In fact, the flavor settles nicely overnight. Keep it covered at room temperature and ice on the same day if you prefer a glossy finish.
What’s the best jam for a true Bakewell taste?
Raspberry jam is traditional for its tartness, which balances the sweet icing and almond sponge.
Cherry jam is lovely if you want to lean into the cherry theme.
Can I reduce the sugar?
You can cut the sponge sugar by about 15% without hurting the texture. The icing is less flexible—reduce slightly and keep it thick enough to set.
How do I toast flaked almonds?
Spread them on a dry baking sheet and toast in a 160°C/320°F oven for 5–7 minutes, stirring once, until lightly golden. Watch closely—they burn fast.
What if I don’t like glacé cherries?
Skip them and decorate with toasted almonds, freeze-dried raspberries, or a few thin stripes of raspberry jam feathered through the icing.
In Conclusion
This Cherry Bakewell Traybake delivers all the familiar almond, jam, and icing notes in a format that’s easy to bake and share.
It’s simple, reliable, and adaptable to whatever you have on hand. Keep the method gentle, don’t rush the cooling, and aim for a thick, smooth icing. You’ll end up with neat squares that look pretty and taste even better.
Perfect for any occasion—or just because you fancy a sweet slice with your tea.