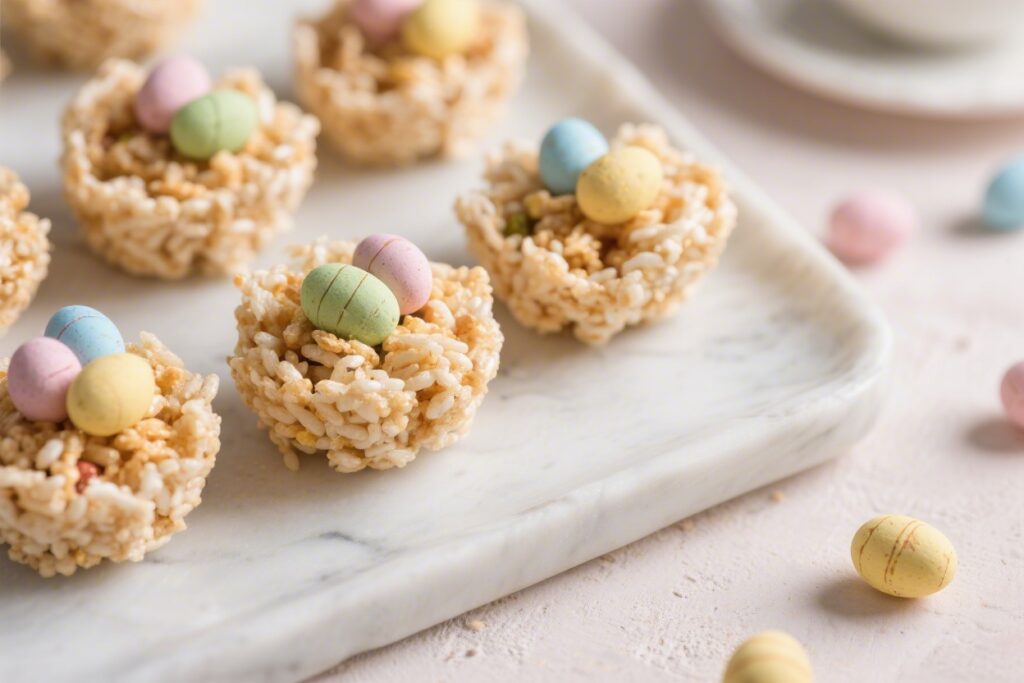
These Easter Rice Krispie Nests are the kind of treat that makes everyone smile. They’re crisp, buttery, marshmallowy, and topped with candy eggs for a playful spring look. Best of all, they’re easy enough for kids to help make and quick enough to whip up on a busy weekend.
No oven, no fuss—just a few simple steps and a sweet, cheerful dessert that’s perfect for baskets, brunches, or school parties.
What Makes This Recipe So Good
This recipe hits that sweet spot between taste, texture, and presentation. The nests are light and crunchy with a gentle chew thanks to melted marshmallows. A hint of vanilla and a little salt keep them from tasting too sweet.
- No-bake and fast: You can have these ready in under 30 minutes.
- Kid-friendly: Shaping the nests and adding candy eggs is a fun activity for small hands.
- Easy to customize: Swap candies, drizzle chocolate, or add coconut “grass.”
- Budget-friendly: Just a handful of pantry staples and seasonal candies.
- Crowd-pleaser: They look festive and taste like classic childhood treats.
Recipe Card

Easter Rice Krispie Nests
Ingredients
- Rice Krispies cereal: About 6 cups. Any crisp rice cereal works.
- Mini marshmallows: 10 ounces (one standard bag). Fresh marshmallows melt best.
- Unsalted butter: 4 tablespoons (1/2 stick). Salted works—just reduce added salt.
- Vanilla extract: 1 teaspoon for cozy flavor.
- Fine sea salt: 1/4 teaspoon to balance sweetness.
- Cooking spray or extra butter: For greasing hands and tins.
- Mini chocolate eggs or jelly beans: For decorating the nests.
- Optional add-ins: 1/2 cup shredded coconut (to toast or tint), pastel sprinkles, white or dark chocolate for drizzling.
- Equipment: Large pot, heatproof spatula, muffin tin (regular or mini), mixing bowl, and measuring cups.
Instructions
- Prep your pan: Lightly grease a regular or mini muffin tin with cooking spray or a thin layer of butter. Grease a large mixing bowl too. Pour the Rice Krispies into the bowl and set aside.
- Melt the butter: In a large pot over low heat, melt the butter until it’s fully liquid and gently foamy, about 1–2 minutes. Keep the heat low to prevent scorching.
- Add marshmallows: Stir in the mini marshmallows and keep stirring constantly until fully melted and smooth. This should take 3–4 minutes. Remove the pot from heat.
- Flavor it: Off the heat, quickly stir in the vanilla and salt. Mix well so the flavor is evenly distributed.
- Combine with cereal: Pour the melted marshmallow mixture over the cereal in the greased bowl. Use a greased spatula to fold until everything is coated. Work quickly before it sets.
- Shape the nests: With lightly greased fingers, press a heaping tablespoon (for mini tins) or 1/4 cup (for regular tins) of the mixture into each muffin cup. Press gently up the sides to make a small well in the center.
- Let them set slightly: Allow the nests to cool for 10–15 minutes until they hold their shape but are still a bit pliable.
- Decorate: Add 2–3 mini chocolate eggs or jelly beans to each nest. For extra flair, place a pinch of tinted coconut “grass” under the eggs or drizzle with melted chocolate.
- Release the nests: Use a butter knife to gently lift out each nest. If they’re sticking, run the knife around the edge first.
- Finish and enjoy: Let them cool completely on a wire rack, then serve or store.
Keeping It Fresh
These treats are best within the first two days. They’ll stay crisp-chewy and flavorful if you store them the right way.
- Room temperature: Store in an airtight container for up to 3–4 days.
Separate layers with parchment to prevent sticking.
- Avoid the fridge: Refrigeration can make them hard and stale.
- Freezing: Not ideal for the best texture, but possible. Freeze in a well-sealed container for up to 1 month. Thaw at room temperature in the closed container to prevent condensation.
- Keep away from heat: Warm rooms or direct sun can make the marshmallow base too soft.
Health Benefits
While these are a treat, there are a few small wins to note.
The portion size is easy to control, especially if you use a mini muffin tin. You also know exactly what’s in them, which can be helpful for avoiding unwanted additives.
- Simple ingredients: Just a handful of pantry staples without long, confusing labels.
- Gluten-friendly option: Use certified gluten-free crisp rice cereal and verify your marshmallows are gluten-free.
- Allergy awareness: You can pick egg-free candies or dye-free options to suit your needs.
- Lower sweetness tweaks: Reduce marshmallows slightly or add extra cereal for a less-sweet bite.
What Not to Do
- Don’t crank the heat: Melting marshmallows on high heat can scorch them and turn the mixture tough.
- Don’t skip greasing: Un-greased hands and tins make shaping frustrating and sticky.
- Don’t overpack the nests: Pressing too hard makes them dense and hard to bite.
- Don’t wait too long to shape: The mixture sets quickly. Work while it’s warm and pliable.
- Don’t add candy too early: Hot nests can melt chocolate eggs.
Let them cool slightly first.
Variations You Can Try
- Chocolate nests: Stir 1/2 cup mini chocolate chips into the marshmallow mixture off heat, or drizzle melted chocolate over the formed nests.
- Coconut grass: Tint 1/2 cup shredded coconut with a few drops of green food coloring and a teaspoon of water, then fluff and add to each nest before the candy eggs.
- Peanut butter twist: Stir 1/3 cup creamy peanut butter into the melted marshmallow mixture for a nutty flavor. Top with peanut butter eggs.
- Sprinkle sparkle: Mix in pastel sprinkles or nonpareils for color and crunch.
- Mini size for parties: Use a mini muffin tin for bite-sized nests. Great for buffets and kids’ parties.
- Fruit-forward: Use pastel jelly beans or fruit-flavored candies instead of chocolate eggs.
- Salty-sweet: Add a light pinch of flaky salt on top after shaping.
Can I make these ahead of time?
Yes.
Make them up to two days ahead and store in an airtight container at room temperature. Add the candy eggs closer to serving if you’re worried about color transfer or softening.
What if I don’t have a muffin tin?
Shape nests by hand on a parchment-lined baking sheet. Pinch up the sides to form a well.
You can also press the mixture into lightly greased cupcake liners for easy removal.
How do I keep the mixture from sticking to my hands?
Lightly grease your hands with butter or spray. Reapply as needed. A greased silicone spatula also helps press the centers down cleanly.
Can I use large marshmallows instead of mini?
Yes.
Use roughly 40 large marshmallows for a 10-ounce equivalent. They’ll take a bit longer to melt, so stir constantly over low heat.
Are these safe for gluten-free diets?
They can be. Use certified gluten-free crisp rice cereal and double-check your marshmallows and candies for gluten-free labeling.
Why are my nests hard or dry?
You likely overheated the marshmallows or packed the mixture too tightly.
Next time, keep the heat low, work quickly, and press gently into the cups.
Can I add food coloring to the nests?
Sure. Stir a few drops of gel food coloring into the melted marshmallows off the heat before mixing with cereal for a pastel tint. Work quickly so it blends evenly.
Wrapping Up
Easter Rice Krispie Nests bring color and joy to any spring table without a lot of work.
They’re quick to make, easy to customize, and always a hit with kids and adults. Keep the heat low, shape them while warm, and have fun with toppings. With a few pantry staples and some candy eggs, you’ll have a sweet, cheerful treat ready in no time.