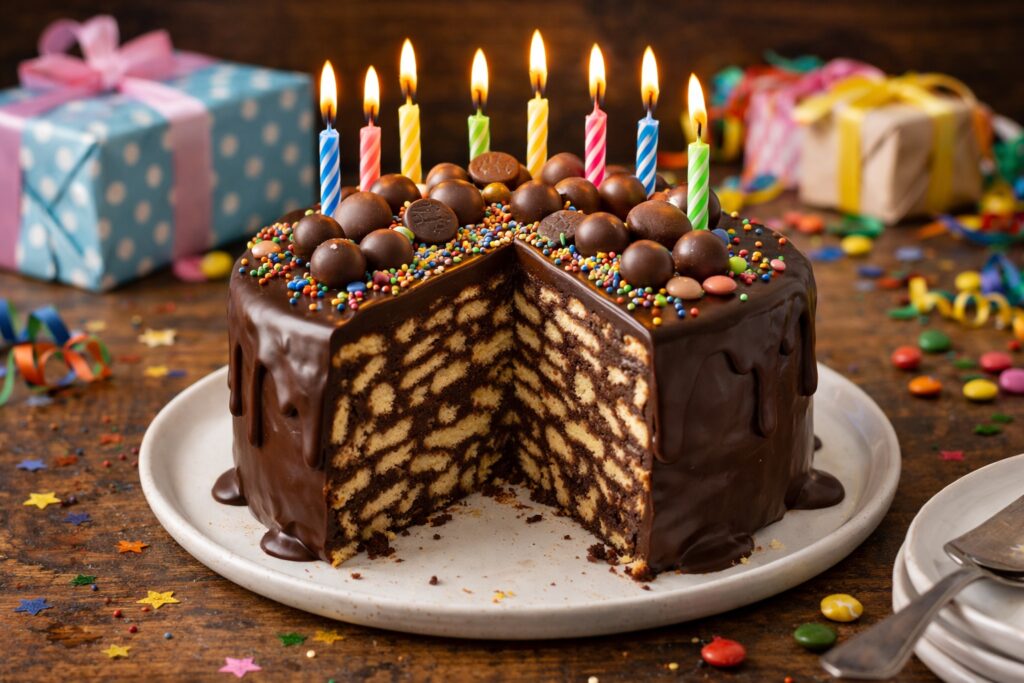
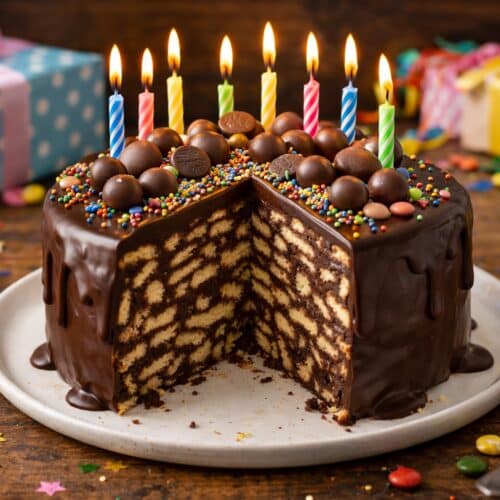
This is the kind of birthday cake that makes people smile before they even taste it. It looks like a proper celebration cake, but it’s secretly made with crunchy biscuits and a rich chocolate mixture—no oven needed. It’s perfect when you want something impressive without the stress of baking.
Kids love the crunch, adults love the nostalgia, and you’ll love how easy it is to pull together. If you can melt chocolate and stir, you can make this cake.
What Makes This Recipe So Good
- No baking, no stress – You don’t need to turn on the oven or worry about a sponge rising. It sets in the fridge.
- Big on chocolate flavor – A mix of chocolate, butter, and syrup gives a fudgy, truffle-like base that hugs every biscuit chunk.
- Customizable – Add nuts, dried fruit, or candies.
Keep it classic or dress it up. It’s hard to go wrong.
- Great make-ahead dessert – It needs chilling time, so you can prep it the day before and focus on the party.
- Perfect for decorations – Finish with a simple ganache, sprinkles, or birthday candles. It slices neatly and looks polished.
Recipe Card
No Bake Chocolate Biscuit Birthday Cake
Ingredients
- 400 g (14 oz) plain tea biscuits (like Digestives or Marie biscuits; graham crackers also work)
- 200 g (7 oz) dark chocolate (50–70% cocoa is ideal)
- 100 g (3.5 oz) milk chocolate (for balance and sweetness)
- 170 g (3/4 cup) unsalted butter
- 120 ml (1/2 cup) golden syrup (or light corn syrup or honey)
- 1 tsp vanilla extract
- Pinch of fine salt
- Optional mix-ins: 75 g (1/2 cup) chopped roasted nuts, 75 g (1/2 cup) raisins or dried cherries, mini marshmallows
- For the ganache topping: 200 g (7 oz) dark or milk chocolate, 120 ml (1/2 cup) heavy cream, 1 tbsp butter (for shine)
- To finish: Sprinkles, chocolate shavings, crushed biscuits, or birthday candles
Instructions
- Prep the tin. Line an 8-inch (20 cm) round springform pan or a 9×5-inch (23×13 cm) loaf pan with parchment, leaving overhang for easy lifting. Lightly grease the sides so the paper sticks.
- Break the biscuits. Place biscuits in a large bowl and break them into rough pieces about the size of a thumb. Keep some smaller crumbs for texture. Don’t crush them into dust.
- Melt the base. In a heatproof bowl, add dark chocolate, milk chocolate, butter, and golden syrup. Set over a pan of barely simmering water (or use short microwave bursts). Stir until smooth and glossy. Remove from heat and stir in vanilla and salt.
- Combine. Pour two-thirds of the chocolate mixture over the broken biscuits. Fold gently until most pieces are coated. If using nuts, dried fruit, or marshmallows, fold them in now. Add more chocolate mixture as needed so everything is lightly but evenly coated. You don’t want pools at the bottom.
- Pack it in. Tip the mixture into the lined pan. Press down firmly with a spatula or the back of a spoon to eliminate gaps. For a smooth top, place a sheet of parchment over the surface and press with your hands.
- Chill to set. Refrigerate for at least 3 hours, or until firm. Overnight is even better for clean slices.
- Make the ganache. Warm the cream until steaming but not boiling. Pour over the chopped chocolate in a bowl. Let sit 2 minutes, then stir until smooth. Add the butter and stir until glossy.
- Finish the cake. Remove the set cake from the pan. Peel away the parchment and set it on a serving plate. Pour the ganache over the top and nudge it to the edges so it gently drips down the sides. Add sprinkles or decorations while the ganache is still soft.
- Set again briefly. Chill 20–30 minutes for the ganache to firm up. Slice with a sharp knife warmed in hot water and wiped dry between cuts.
Keeping It Fresh
- Fridge: Store the cake, covered, in the refrigerator for up to 5 days. The texture stays pleasantly crisp for the first couple of days, then softens slightly.
- Freezer: Wrap slices tightly and freeze for up to 2 months.
Thaw in the fridge for a few hours before serving. The crunch comes back nicely.
- Room temp for serving: Let the cake sit out 10–15 minutes before slicing so the ganache softens slightly and the flavors bloom.
Why This is Good for You
- Less fuss, less stress: No bake means fewer steps to fail. That’s good for your sanity, especially on a busy birthday.
- Portion control: It’s rich, so small slices satisfy.
A little goes a long way.
- Flexible ingredients: You can add nuts for healthy fats, swap in higher-cocoa chocolate, or use wholegrain biscuits for more fiber.
- Make-ahead peace of mind: Preparing it in advance frees up time on the day to actually enjoy the celebration.
What Not to Do
- Don’t crush the biscuits into powder. You want chunks for that signature crunch. Fine crumbs make the cake dense.
- Don’t overheat the chocolate. Burnt or split chocolate turns grainy. Melt gently and stir often.
- Don’t skip the salt. A pinch brightens the chocolate and keeps it from tasting flat.
- Don’t rush the chill time. If it’s not fully set, it will crumble when sliced and the ganache may slide.
- Don’t overload with wet mix-ins. Moist add-ins (like very juicy dried fruit) can make the base soggy.
Pat them dry first.
Variations You Can Try
- Classic British fridge cake: Add chopped digestive biscuits, raisins, and a handful of chopped walnuts. Dust with cocoa instead of ganache.
- Birthday sprinkle version: Stir rainbow sprinkles into the biscuit base and top with more sprinkles on the ganache.
- Peanut butter swirl: Whisk 2–3 tablespoons of smooth peanut butter into the melted chocolate base. Top with chopped roasted peanuts.
- Mocha twist: Dissolve 1 teaspoon of instant espresso in the melted mixture for a subtle coffee note that deepens the chocolate.
- Orange chocolate: Add 1 teaspoon orange zest and a few drops of orange extract.
Top with candied orange peel.
- Gluten-free: Use gluten-free plain biscuits. Check that your chocolate and syrup are certified gluten-free.
- Vegan-friendly: Use dairy-free chocolate, vegan butter, and a plant-based cream for the ganache. Choose vegan biscuits.
FAQ
Can I make this the day before?
Yes.
In fact, it’s better the next day. Make it, chill overnight, and add decorations on the day if you like. The slices will be cleaner and the flavors more settled.
What biscuits work best?
Plain, not-too-sweet biscuits like Digestives, Rich Tea, Marie biscuits, or graham crackers work great.
Avoid cream-filled cookies; they can make the base overly sweet and greasy.
How do I keep the chocolate from seizing?
Melt low and slow. Use a double boiler with barely simmering water, and keep water out of the bowl. If microwaving, use short 20–30 second bursts and stir between each.
Can I skip the ganache?
Absolutely.
Press the mixture into the tin, chill until firm, then dust with cocoa powder or drizzle with melted chocolate. It will still look and taste fantastic.
How do I get neat slices?
Use a sharp knife warmed in hot water, then wiped dry. Press straight down rather than sawing.
Clean and rewarm the knife between cuts.
Is it very sweet?
It’s rich and sweet, but the dark chocolate and pinch of salt keep it balanced. If you prefer less sweetness, use all dark chocolate and plain biscuits.
My cake crumbled when slicing. What went wrong?
It likely wasn’t fully set or the biscuit pieces were too large and loosely packed.
Chill longer, press the mixture more firmly into the tin, and warm the knife before slicing.
Can I turn this into cupcakes or bars?
Yes. Press the mixture into a lined 8-inch square pan and cut into bars, or spoon into lined muffin tins for individual portions. Adjust chilling time as needed.
Final Thoughts
This No Bake Chocolate Biscuit Birthday Cake is proof that celebration desserts don’t need to be complicated.
It’s forgiving, adaptable, and reliably delicious. Make it once and you’ll keep it in your back pocket for every birthday, potluck, and “I need something chocolatey” moment. Light the candles, slice small, and watch it disappear.