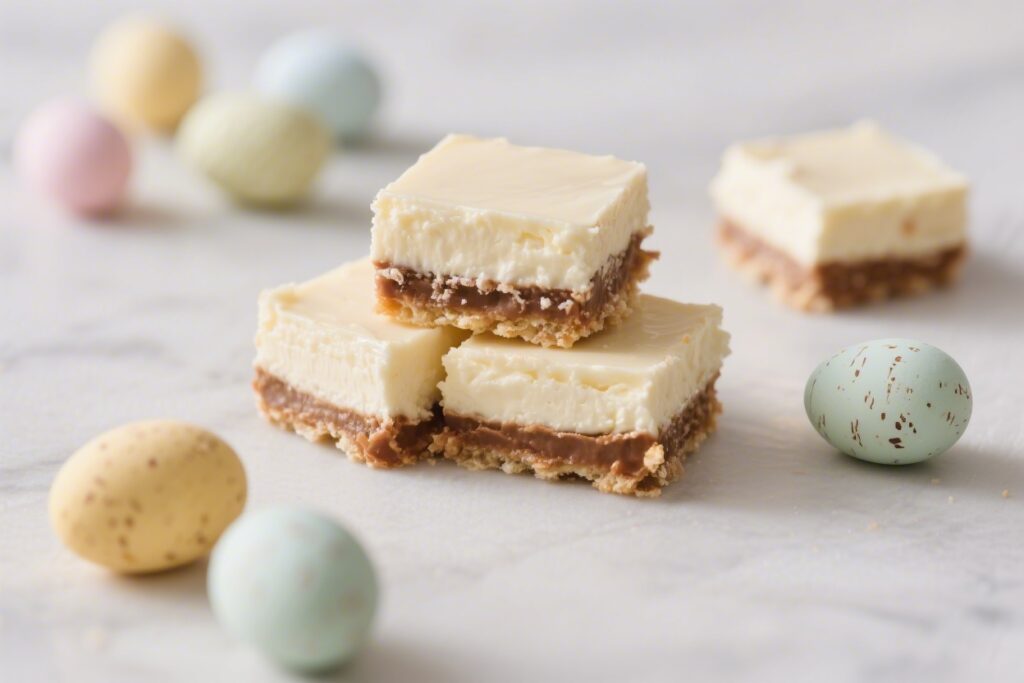
These No Bake Mini Egg Cheesecake Bars are the kind of treat that makes everyone smile. They’re creamy, crunchy, chocolaty, and full of those pastel candy shells that feel like pure joy. No oven needed, minimal effort, and a texture that’s light yet satisfying.
They’re perfect for spring gatherings, birthdays, or a casual weekend sweet. If you like desserts that look fun but taste even better, this one checks every box.
What Makes This Recipe So Good
- No baking required: The fridge does all the work, so you avoid the fuss of ovens and water baths.
- Balanced texture: A buttery biscuit base, silky cheesecake filling, and crunchy Mini Eggs in every bite.
- Simple ingredients: Everything is easy to find and budget-friendly.
- Great make-ahead dessert: Sets in the fridge and slices cleanly when chilled overnight.
- Festive but flexible: Swap in different chocolate candies for any season or occasion.
Ingredients
- For the base:
- Digestive biscuits or graham crackers (about 250 g or 2 cups crushed)
- Unsalted butter (100 g or 7 tablespoons), melted
- Pinch of fine salt
- For the cheesecake filling:
- Cream cheese, full fat, brick-style (450 g or 16 oz), softened
- Icing sugar/powdered sugar (100 g or 3/4 cup), sifted
- Vanilla extract (2 teaspoons)
- Lemon zest (optional, 1 teaspoon) for brightness
- Double cream or heavy whipping cream (240 ml or 1 cup), cold
- Mini Eggs (225–300 g or 8–10 oz), roughly crushed
- For topping (optional but recommended):
- More Mini Eggs, halved or crushed
- Melted chocolate or chocolate shavings
- Sprinkles, if you’re feeling festive
Instructions
- Prep your pan: Line an 8×8-inch (20×20 cm) square pan with parchment, leaving overhang for easy lifting. Lightly grease the sides so slices release cleanly.
- Make the base: Crush the biscuits or crackers into fine crumbs.Stir in melted butter and a pinch of salt until the texture feels like wet sand.
- Press and chill: Tip the crumb mixture into the pan. Press it down firmly with the bottom of a measuring cup to create an even base. Chill in the fridge while you make the filling.
- Beat the cream cheese: In a large bowl, beat the softened cream cheese until smooth and lump-free.Add icing sugar, vanilla, and lemon zest (if using). Beat again until creamy.
- Whip the cream: In a separate bowl, whip the cold double/heavy cream to stiff peaks. It should hold its shape but not look grainy.
- Fold together: Gently fold the whipped cream into the cream cheese mixture in two additions.Keep it light so you don’t deflate the mixture.
- Add the Mini Eggs: Roughly crush the Mini Eggs using a rolling pin or the bottom of a pan. Fold them through the cheesecake filling, reserving a handful for the top if desired.
- Assemble: Spoon the filling over the chilled base. Smooth the top with an offset spatula.Sprinkle extra crushed Mini Eggs over the top and gently press so they adhere.
- Chill to set: Cover and refrigerate at least 6 hours, preferably overnight. The longer chill helps clean slices and the perfect texture.
- Slice and serve: Lift out using the parchment overhang. Warm a sharp knife under hot water, wipe dry, then slice into bars.Clean the knife between cuts for neat edges.
How to Store
- Fridge: Store covered in the refrigerator for up to 4 days. Keep the pan covered, or place slices in an airtight container.
- Freezer: Freeze bars (without extra toppings) for up to 1 month. Wrap tightly in parchment and foil, then place in a freezer bag.Thaw overnight in the fridge before serving.
- Ahead of time: You can make the base and filling a day early, assemble, and chill overnight. Add final toppings the day you plan to serve for best crunch.
Why This is Good for You
- Portion control: Bars make it easy to serve sensible slices without overdoing it.
- Protein and calcium: Cream cheese and cream offer a bit of both, which can keep you fuller for longer compared to a purely sugary dessert.
- No bake means less stress: Lower effort can make homemade desserts more accessible, helping you skip ultra-processed store-bought options when you want a treat.
- Customizable sweetness: You control the sugar and toppings, so you can adjust to your preference.
Pitfalls to Watch Out For
- Runny filling: If your cream isn’t whipped to stiff peaks, the bars won’t set well. Keep the cream cold and stop once peaks stand up firmly.
- Soft base: Use enough butter and compact the crumbs tightly.If using a larger pan, the base may be too thin and crumbly.
- Overmixing: Stir gently when folding in whipped cream. Overmixing deflates the air and leads to a dense, loose texture.
- Warm ingredients: Start with softened cream cheese, but keep everything else cold. Warm filling takes longer to set.
- Sticky slices: Clean and warm the knife between cuts for neat edges and intact layers.
Alternatives
- Different candy: Swap Mini Eggs for M&M’s, chopped chocolate bars, or peanut butter cups.
- Flavor twist: Add 2 tablespoons cocoa powder to the filling for chocolate cheesecake.Or swirl in 1/3 cup warmed hazelnut spread.
- Citrus lift: Use orange zest instead of lemon for a chocolate-orange vibe.
- Gluten-free: Use gluten-free biscuits or graham-style cookies.
- Lighter version: Use Neufchâtel cheese and reduce the candy by half. The texture stays creamy, but slightly less rich.
- Base swap: Try crushed chocolate sandwich cookies (remove filling if you prefer less sweet) with 5–6 tablespoons melted butter.
FAQ
Can I use whipping cream instead of heavy cream?
Yes, as long as it whips to stiff peaks. Look for at least 30–36% fat content.
If it’s lower, it may not hold as well.
Do I need gelatin for these bars?
No. With properly whipped cream and enough chill time, the bars set without gelatin. If you want an extra-firm slice, you can bloom 1 teaspoon powdered gelatin in 2 tablespoons cold water, melt gently, and mix into the cream cheese before folding in the whipped cream.
How do I crush Mini Eggs without breaking the candy coating into dust?
Place them in a zip-top bag, squeeze out air, and lightly tap with a rolling pin.
Aim for uneven chunks so you get both crunch and chocolate in each bite.
My base crumbles when I slice. What went wrong?
It likely needed more butter or firmer packing. Next time, add an extra tablespoon of melted butter and press down harder.
Also, chill longer before slicing.
Can I make this in a 9×13-inch pan?
You can, but the layers will be thinner. Consider multiplying the recipe by 1.5 for a fuller height, and increase chill time by 1–2 hours.
Is there a way to reduce the sweetness?
Cut the icing sugar to 2/3 cup, and use dark chocolate Mini Eggs or mix in roasted nuts for balance. A bit of lemon zest also helps brighten and counter sweetness.
How long should I chill the bars?
At least 6 hours, but overnight is best for clean cuts and a fully set texture.
Can I add fruit?
Yes.
Fold in a handful of freeze-dried raspberries or swirl a few spoonfuls of raspberry sauce on top before chilling. Avoid fresh fruit inside the filling, as it can release moisture.
What if I only have tub-style cream cheese?
It can work, but it’s softer. Drain off any excess liquid and add 1–2 tablespoons more icing sugar to help stabilize, or use a bit of gelatin as noted above.
Wrapping Up
These No Bake Mini Egg Cheesecake Bars are the kind of dessert that looks impressive but takes minimal effort.
The combo of creamy filling, buttery base, and crunchy chocolate bits delivers every time. Make them a day ahead, slice when cold, and watch them disappear. Whether it’s a spring holiday or just a Tuesday treat, this recipe brings fun and flavor without turning on the oven.
Enjoy every colorful, creamy bite.