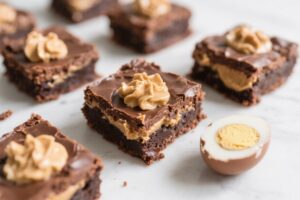
Peanut butter and chocolate are a classic duo for a reason, and these cookie bars bring them together in the easiest way. No scooping dough, no waiting on multiple batches—just spread, bake, slice, and enjoy. The bars are thick, soft in the center, and loaded with melty chocolate chips.
They’re perfect for bake sales, weeknight treats, or bringing to a potluck when you want something everyone will love. If you like a cookie that leans chewy with just a bit of crisp at the edges, this recipe is your new go-to.
What Makes This Special
These bars deliver the comfort of a chocolate chip cookie with the richness of peanut butter in one pan. Because they’re baked as bars, the texture stays softer and chewier than most drop cookies.
The peanut butter adds moisture and flavor without overwhelming the chocolate. Best of all, it’s a one-bowl batter with pantry staples, so you can whip it up in minutes. It’s the kind of recipe that feels easy yet special enough to share.
Ingredients
- 1/2 cup (1 stick) unsalted butter, melted and slightly cooled
- 3/4 cup creamy peanut butter (not natural; use a no-stir variety for best texture)
- 3/4 cup packed light brown sugar
- 1/3 cup granulated sugar
- 2 large eggs, at room temperature
- 2 teaspoons vanilla extract
- 1 3/4 cups all-purpose flour
- 1/2 teaspoon baking soda
- 1/2 teaspoon baking powder
- 1/2 teaspoon fine salt
- 1 1/4 cups semisweet chocolate chips (plus a handful for topping)
- Optional: 1/2 cup chopped roasted peanuts for crunch
- Optional finishing: Flaky sea salt for sprinkling
Instructions
- Prep the pan and oven. Heat the oven to 350°F (175°C).Line a 9×13-inch baking pan with parchment, leaving overhang on the long sides for easy lifting. Lightly grease the parchment.
- Melt the butter. Melt the butter and let it cool for 5 minutes so it doesn’t scramble the eggs or melt the chocolate later.
- Mix the wet ingredients. In a large bowl, whisk the melted butter, peanut butter, brown sugar, and granulated sugar until smooth and glossy. Whisk in the eggs and vanilla until well combined.
- Whisk the dry ingredients. In a separate bowl, whisk the flour, baking soda, baking powder, and salt.
- Combine the mixtures. Add the dry ingredients to the wet and stir with a spatula just until no dry streaks remain.The dough will be thick.
- Fold in the chocolate. Stir in 1 1/4 cups chocolate chips (and peanuts, if using). Don’t overmix.
- Spread in the pan. Press the dough evenly into the prepared pan. Scatter a few extra chocolate chips on top for a bakery-style look.
- Bake. Bake for 20–25 minutes, until the edges are set and lightly golden and the center looks just barely set.A toothpick should come out with a few moist crumbs, not wet batter.
- Cool and finish. Cool in the pan on a rack for at least 30–45 minutes. If you like, sprinkle a pinch of flaky sea salt while still warm. Lift out with the parchment and slice into bars.
- Serve. Enjoy slightly warm for melty chips, or let them cool fully for cleaner cuts and chewier texture.
Keeping It Fresh
Store the bars in an airtight container at room temperature for up to 4 days.
They stay soft thanks to the peanut butter. For extra insurance, tuck a slice of bread in the container to keep moisture levels steady. To freeze, wrap individual bars tightly and store in a freezer bag for up to 2 months.
Thaw at room temperature or warm gently in the microwave for 10–15 seconds.
Benefits of This Recipe
- Simple and fast: One bowl, pantry staples, no special equipment.
- Great texture: Chewy centers with lightly crisp edges.
- Scalable: Easy to double for a party or halve for a small batch.
- Reliable: The batter is forgiving and doesn’t require chilling.
- Portable: Perfect for lunchboxes, road trips, and potlucks.
Pitfalls to Watch Out For
- Overbaking: These bars can go from perfectly chewy to dry if baked too long. Pull them when the center is set but still soft.
- Using natural peanut butter: Stirred natural varieties can cause greasy or crumbly bars. Use a no-stir creamy peanut butter for consistent results.
- Hot butter: If the butter is too hot, it can curdle the eggs or make the batter greasy.Let it cool slightly before mixing.
- Packing the flour: Scooping straight from the bag can compact flour. Spoon and level, or weigh it for accuracy.
- Uneven spreading: Thick dough can hump in the center. Press it out to the corners for even baking.
Recipe Variations
- Swirled Nutella: Dollop 1/3 cup Nutella over the batter and swirl with a butter knife before baking.
- Peanut Butter Cup Chunks: Fold in chopped mini peanut butter cups with the chocolate chips.
- Oatmeal Crunch: Replace 1/2 cup of the flour with old-fashioned oats for texture.
- Gluten-Free: Use a cup-for-cup gluten-free flour blend with xanthan gum.Watch bake time; it may finish a couple minutes earlier.
- Dark Chocolate + Sea Salt: Swap semisweet chips for chopped dark chocolate and finish with flaky salt.
- White Chocolate + Raspberry: Use white chocolate chips and gently fold in 1/2 cup freeze-dried raspberries.
- Almond Butter Twist: Substitute almond butter for peanut butter and add 1/2 teaspoon almond extract.
- Espresso Boost: Add 1 teaspoon instant espresso powder to the dry ingredients for a mocha vibe.
FAQ
Can I use natural peanut butter?
You can, but results vary. Natural peanut butter can cause the bars to be oily or crumbly. If you use it, stir it very well to reincorporate the oil and consider adding an extra tablespoon of flour to help bind.
How do I know when the bars are done?
Look for lightly browned edges and a center that’s set but soft.
A toothpick inserted near the center should come out with a few moist crumbs, not wet batter. Err on the side of slightly underbaked for chewiness.
Can I make these in an 8×8-inch pan?
Yes, but the bars will be thicker and need more time. Start checking at 28 minutes and bake until the center is set.
Tent with foil if the top browns too quickly.
What if I only have salted butter?
Go ahead and use it, but reduce the added salt to a small pinch. Taste the dough if you’re comfortable, and adjust before adding the chocolate chips.
Can I add nuts?
Absolutely. Chopped roasted peanuts add crunch and amplify the peanut flavor.
Walnuts or pecans also work well and bring a toasty note.
How do I get clean slices?
Let the bars cool almost completely. Use the parchment overhang to lift, then cut with a sharp knife, wiping the blade between cuts. For extra neatness, chill for 20 minutes before slicing.
Can I reduce the sugar?
You can reduce the total sugar by about 2–3 tablespoons without major texture changes.
Any more than that and the bars may be drier and less chewy.
Why did my bars sink in the middle?
This can happen if the batter was overmixed, the oven temperature was off, or the center was underbaked. Use room temperature eggs, measure flour accurately, and bake until just set in the center.
Wrapping Up
Peanut Butter and Chocolate Chip Cookie Bars hit that sweet spot between nostalgic and impressive, with minimal effort and maximum payoff. They’re soft, rich, and packed with chocolate, and they hold up beautifully for sharing.
Keep this recipe in your back pocket for busy weeks, last-minute gatherings, or whenever you want a sure thing. Once you make them, they’ll earn a permanent spot in your dessert rotation.