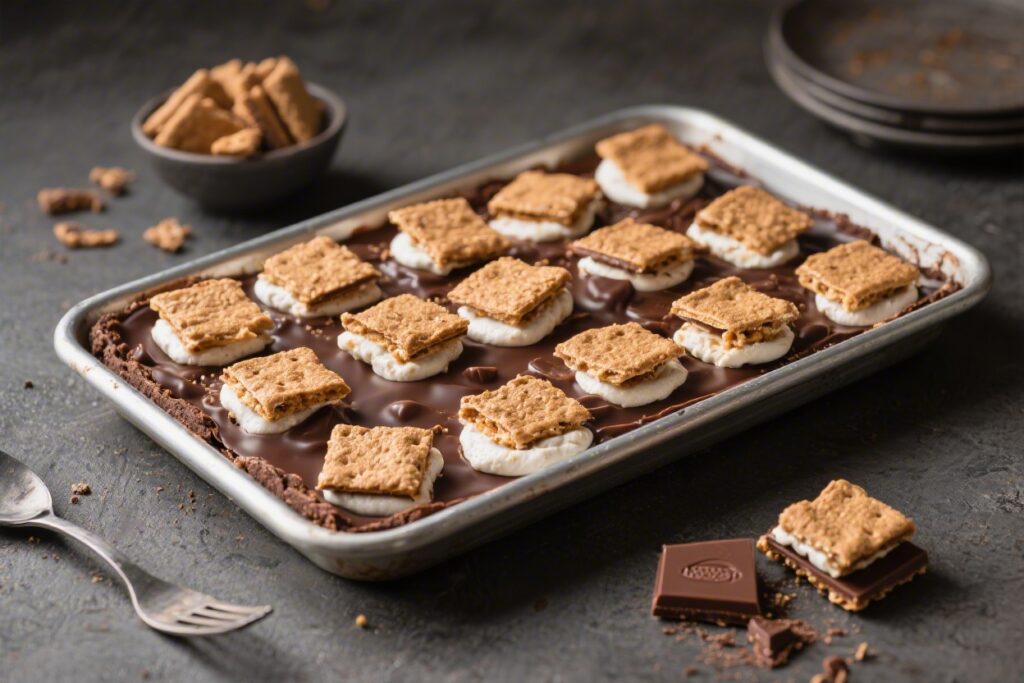
S’mores bring out the kid in everyone. This chocolate traybake keeps all the campfire charm, minus the smoke and mess. You get buttery biscuit base, rich chocolate layer, and a fluffy, toasted marshmallow topping in every square.
It’s easy to make, easy to slice, and perfect for parties, bake sales, or a cozy night in. If you love texture and deep chocolate flavor, this one hits all the right notes.
What Makes This Recipe So Good
- All the s’mores flavors in one pan: Buttery graham cracker (or digestives), smooth chocolate, and toasted marshmallows.
- Low-fuss but impressive: Simple steps, familiar ingredients, and a dramatic marshmallow topping that always wows.
- Great make-ahead dessert: The base and chocolate layer set well, so you can prep ahead and toast the marshmallows just before serving.
- Adaptable: Swap biscuits, use different chocolate, or add nuts and peanut butter. It’s a flexible base recipe.
- Feeds a crowd: A traybake slices neatly into squares for sharing with minimal mess.
Ingredients
- Graham crackers or digestive biscuits (about 300 g / 10.5 oz), crushed
- Unsalted butter (150 g / 10.5 tbsp), melted
- Light brown sugar (2 tbsp), for the base
- Salt (a pinch), for balance
- Dark or semisweet chocolate (400 g / 14 oz), chopped
- Heavy cream (double cream) (240 ml / 1 cup)
- Vanilla extract (1 tsp)
- Mini marshmallows (300 g / 10.5 oz)
- Optional add-ins: Peanut butter (2–3 tbsp), chopped roasted peanuts or pecans (1/2 cup), flaky sea salt, or a splash of bourbon
- Nonstick spray or extra butter for greasing the pan
Instructions
- Prepare your pan: Line a 9×13-inch (23×33 cm) baking tin with parchment, leaving overhang for easy lifting.Lightly grease the sides.
- Make the biscuit base: Mix crushed graham crackers/digestives, melted butter, brown sugar, and a pinch of salt until the crumbs are evenly moistened and clump when pressed.
- Press and chill: Tip the mixture into the pan. Press firmly into an even layer using the bottom of a measuring cup. Chill in the fridge for 15 minutes while you make the chocolate layer.
- Heat the cream: Warm the heavy cream in a small saucepan over medium heat until steaming and just starting to bubble at the edges.Do not let it boil.
- Make the chocolate layer: Place chopped chocolate in a heatproof bowl. Pour hot cream over it, let sit 2 minutes, then stir slowly until smooth. Stir in vanilla.If using peanut butter or a splash of bourbon, add it now.
- Pour and set: Pour the chocolate over the chilled base. Smooth the top. Sprinkle with flaky sea salt if you like.Chill for 45–60 minutes, until mostly set but still slightly soft to the touch.
- Add marshmallows: Scatter mini marshmallows in an even layer over the chocolate, pressing lightly so they stick. You want full coverage.
- Toast the top: Use a kitchen torch to toast the marshmallows until golden and blistered. No torch?Pop the tray under a hot broiler/grill on the top rack for 1–3 minutes. Watch closely—marshmallows go from golden to burnt fast.
- Cool and firm up: Let the traybake sit at room temperature for 15 minutes, then chill for 30–45 minutes to help it slice cleanly without melting the chocolate layer.
- Slice and serve: Lift out using the parchment overhang. Use a sharp knife greased with a little butter or oil for neat cuts.Wipe the blade between slices. Serve slightly chilled or at cool room temperature.
Storage Instructions
- Fridge: Store slices in an airtight container for 4–5 days. Layer with parchment to prevent sticking.
- Room temperature: Safe for 1 day in a cool room, but the chocolate may soften and marshmallows can get tacky.
- Freezer: Freeze without the marshmallow layer for up to 2 months.Add and toast marshmallows after thawing for the best texture.
- Re-crisping: If the marshmallows lose their toastiness, a quick pass with a kitchen torch perks them up.
Health Benefits
- Portion control is easy: Traybakes slice into small squares, so you can keep portions modest while satisfying a sweet craving.
- Dark chocolate perks: Choosing 60–70% cocoa chocolate brings antioxidants and deeper flavor, meaning you may feel content with less.
- Balanced sweetness: The pinch of salt and use of semisweet or dark chocolate help keep the dessert from being cloying.
- Customizable add-ins: Nuts add healthy fats and a bit of protein, improving satiety and texture.
What Not to Do
- Don’t skip chilling the base: A warm, soft base will shift when you pour the chocolate, leading to uneven layers.
- Don’t overheat the cream: Boiling cream can split the chocolate. Heat until steaming, not boiling.
- Don’t broil unattended: Marshmallows can burn in seconds. Keep the oven door slightly open and watch constantly.
- Don’t cut while too warm: The chocolate layer will ooze and the marshmallows will drag.Let it firm up for clean slices.
- Don’t use wet tools: Water can seize melted chocolate. Keep bowls and utensils completely dry.
Variations You Can Try
- Salted Peanut Butter Swirl: Dollop 3 tablespoons of warmed peanut butter onto the chocolate layer and swirl with a skewer before chilling. Top with chopped roasted peanuts.
- Mocha S’mores: Stir 1–2 teaspoons of espresso powder into the hot cream for a coffee kick.
- Caramel Drizzle: After toasting the marshmallows, drizzle warm salted caramel over the top and finish with flaky sea salt.
- Nutty Biscuit Base: Replace one-third of the biscuit crumbs with finely ground toasted almonds or hazelnuts for extra flavor.
- Berry Burst: Scatter a handful of freeze-dried raspberries over the chocolate before adding marshmallows for a tangy contrast.
- Gluten-Free: Use certified gluten-free graham crackers or oat biscuits.Check marshmallows for GF labeling.
- Vegan Option: Use dairy-free butter, coconut cream or plant-based cream, vegan dark chocolate, and vegan marshmallows.
FAQ
Can I use milk chocolate instead of dark?
Yes, but reduce the cream slightly to keep the chocolate layer firm. Use about 200 ml (a scant cup) cream for milk chocolate, since it’s softer and sweeter than dark.
How do I crush the biscuits without a food processor?
Place them in a zip-top bag and crush with a rolling pin until fine, even crumbs form. Avoid big chunks, which can make the base crumbly.
My chocolate split.
Can I fix it?
Often, yes. Whisk in a splash of warm cream, a teaspoon at a time, until it comes back together. Gentle heat and patience usually help.
Do I need a kitchen torch?
No.
A hot broiler/grill works well. Keep the pan close to the heat and watch carefully. Rotate the tray for even browning.
Why is my base falling apart?
It likely needs more butter or firmer packing.
Measure your crumbs accurately and press the mixture into the pan with real pressure. Chilling helps it set.
Can I make this a day ahead?
Absolutely. Make the base and chocolate layer, chill overnight, then add and toast the marshmallows just before serving for the best texture.
What size pan can I use if I don’t have 9×13?
A 20×20 cm (8×8-inch) pan works for a thicker traybake; reduce the base slightly or embrace the extra height.
Baking times don’t apply here, but allow longer chilling.
How do I get clean slices through the marshmallow?
Lightly oil a sharp knife and wipe it between cuts. Chilling the traybake for 30–45 minutes before slicing also helps.
Can I add whole marshmallows instead of mini?
Yes, but cut them in half and pack them tightly for even coverage. Minis toast more evenly, but halved large marshmallows look rustic and fun.
Is there a no-cream option for the chocolate layer?
You can melt chocolate with 2–3 tablespoons of butter and a splash of milk, but the ganache texture from cream is silkier and sets more reliably.
In Conclusion
This S’mores Chocolate Traybake delivers big flavor with simple steps and pantry-friendly ingredients.
The buttery base, lush chocolate, and toasted marshmallow topping make it a guaranteed hit. It’s flexible, make-ahead friendly, and slices into neat, shareable squares. Keep this recipe on hand for gatherings, weeknight treats, or any time you want a nostalgic dessert without the campfire fuss.