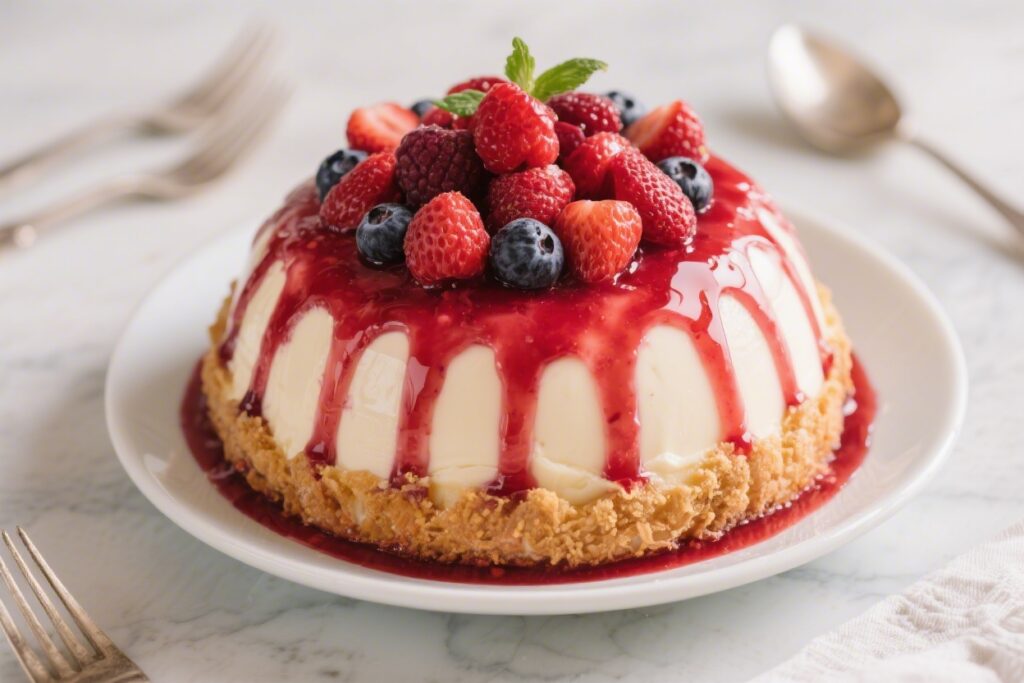
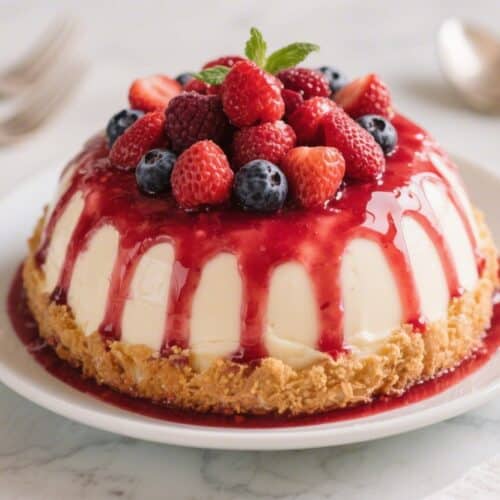
This is the dessert that makes people lean in, smile, and ask for seconds. A Summer Berry Pudding Bombe looks dramatic, slices cleanly, and tastes like sunshine soaked into bread and berries. It’s old-fashioned British pudding meets modern party trick, and it comes together with simple ingredients.
If you can line a bowl with bread and simmer fruit, you can pull this off. Expect a glossy, ruby dome, a burst of tart-sweet berry syrup, and soft, jammy layers that feel like the best part of summer.
Summer Berry Pudding Bombe (Showstopper Style) – A Bright, Juicy Centerpiece
Ingredients
- For the Berry Syrup and Filling: 600 g mixed berries (strawberries hulled and halved, raspberries, blueberries, blackberries)
- 120 g granulated sugar (adjust to taste based on berry sweetness)
- 2–3 tbsp fresh lemon juice
- 1 tsp vanilla extract (optional)
- 1 tbsp crème de cassis or Chambord (optional, adults-only)
- For the Bread Shell: 10–14 slices soft white sandwich bread, crusts removed (brioche or challah works too)
- Softened unsalted butter, for lightly greasing the bowl (optional)
- For Assembly and Finish: Fresh berries for garnish
- Lightly sweetened whipped cream or crème fraîche, for serving
- Mint leaves (optional)
- Equipment: 1.5–2 L pudding basin or mixing bowl (metal or glass), rounded
- Plastic wrap
- Small saucepan
- Sieve
- Rolling pin (optional, for flattening bread)
Instructions
- Prep the bowl. Lightly butter a 1.5–2 L rounded bowl, then line it fully with plastic wrap, leaving plenty of overhang.This makes unmolding easy and clean.
- Cook the berries briefly. Add mixed berries, sugar, and lemon juice to a saucepan. Warm over medium heat for 3–5 minutes until the fruit releases juices and softens but still holds shape. Stir gently.Remove from heat.
- Flavor the syrup. Stir in vanilla and liqueur if using. Taste the juices and adjust with a pinch more sugar or lemon. You want a bright, balanced syrup, not cloying.
- Strain to collect syrup. Pour the fruit through a sieve set over a bowl.Reserve the fruit in one bowl and the vibrant syrup in another. Let both cool to lukewarm. You’ll use the syrup to stain the bread and to brush layers.
- Trim and shape the bread. Remove crusts and, if needed, lightly roll slices to make them thinner and more flexible.Cut one slice into a neat circle to fit the very bottom center of your bowl.
- Line the bowl. Dip one side of the bottom circle lightly in syrup and place it, stained side down, in the base of the bowl. Then cut other slices into neat rectangles or triangles and line the sides, overlapping slightly and pressing together so there are no gaps. A tight, gap-free shell prevents leaks and keeps the bombe neat.
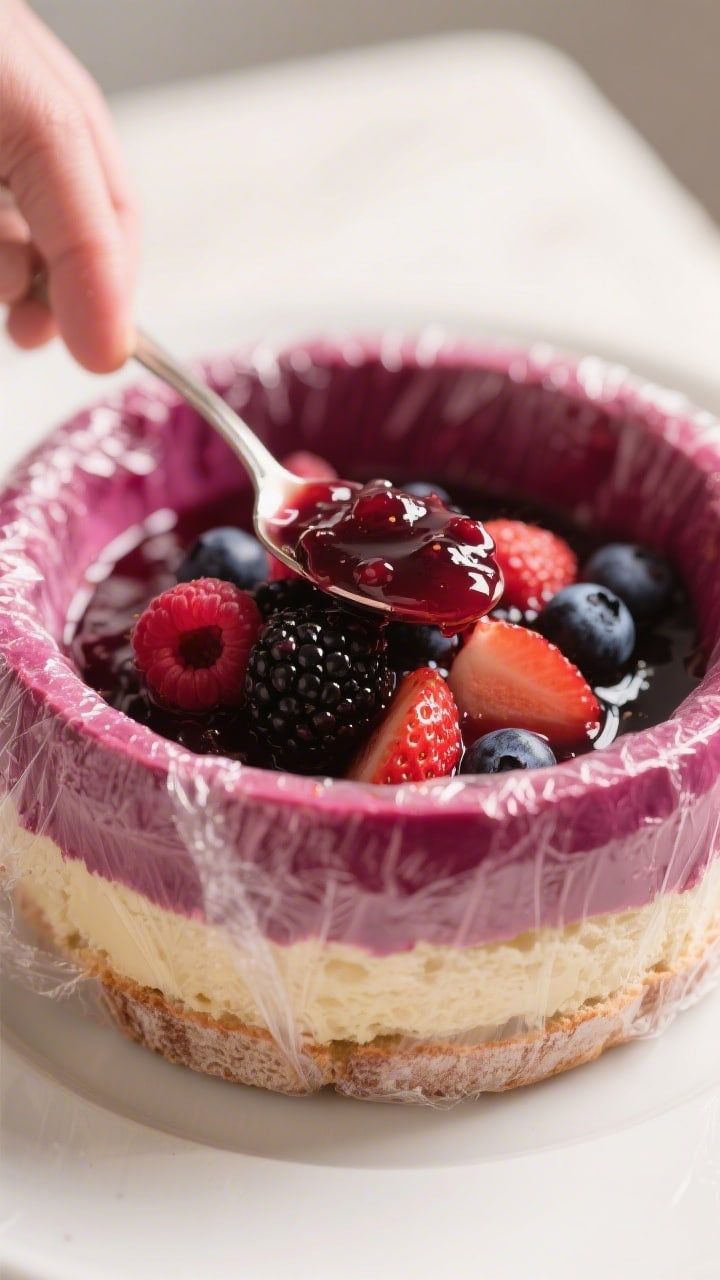
- Add the first fruit layer. Spoon in a layer of berries (about one-third). Drizzle 1–2 tablespoons of syrup over to moisten the bread shell where it meets the fruit, but don’t flood it.
- Create a bread “middle.” Add a layer of bread slices over the fruit, fitting pieces snugly.Brush or spoon a little syrup over the bread to stain it. Press gently with your fingers to compact.
- Repeat layers. Add the second third of berries, then another thin bread layer with a touch of syrup. Finish with the final berries.Keep at least 1 cm of space at the top for the final bread seal.
- Seal the top. Arrange a final layer of bread over the last fruit. Spoon a little syrup across the top so the bread picks up color. Fold over the plastic wrap to tightly close the bombe.
- Weigh it down. Place a small plate or flat lid directly on top of the wrapped pudding and weigh it with a can or jar. Chill for at least 6 hours, ideally overnight. The weight helps the bread absorb syrup and sets the shape.
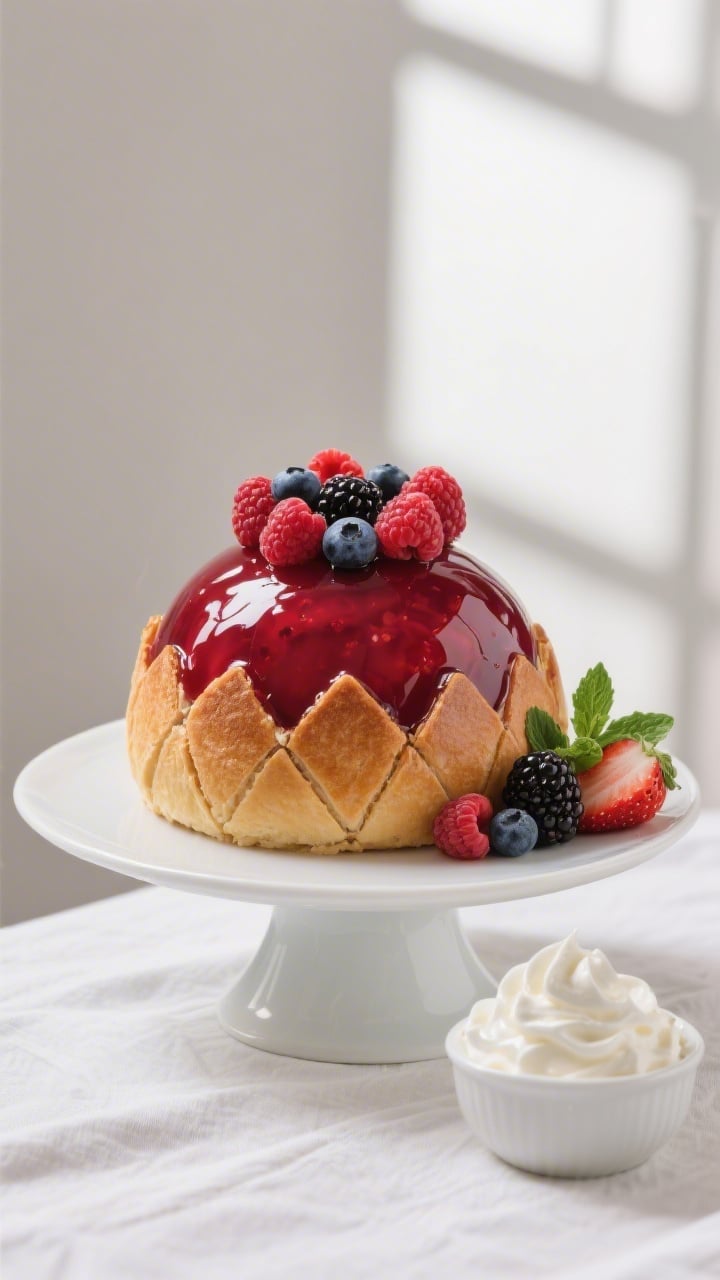
- Unmold with confidence. Remove weights and unwrap the top.Invert the bowl onto a serving plate and lift it off, using the plastic wrap edges to help release. Brush any pale patches with leftover syrup for a glossy, even finish.
- Garnish and serve. Decorate with fresh berries and mint. Serve in neat wedges with whipped cream or crème fraîche.The contrast of tangy fruit and cool cream is chef’s kiss.
What Makes This Special
This bombe takes a humble pantry staple—white bread—and turns it into a silky, berry-stained shell that holds a treasure of fruit inside. It’s make-ahead, which means less stress on the day you serve it.
The filling is flexible: use whatever berries look best, frozen or fresh. And the “wow” factor is huge once you flip it out and reveal those stained glass edges. Plus, it slices beautifully, so everyone gets a perfect wedge of color and flavor.
Ingredients
- For the Berry Syrup and Filling:
- 600 g mixed berries (strawberries hulled and halved, raspberries, blueberries, blackberries)
- 120 g granulated sugar (adjust to taste based on berry sweetness)
- 2–3 tbsp fresh lemon juice
- 1 tsp vanilla extract (optional)
- 1 tbsp crème de cassis or Chambord (optional, adults-only)
- For the Bread Shell:
- 10–14 slices soft white sandwich bread, crusts removed (brioche or challah works too)
- Softened unsalted butter, for lightly greasing the bowl (optional)
- For Assembly and Finish:
- Fresh berries for garnish
- Lightly sweetened whipped cream or crème fraîche, for serving
- Mint leaves (optional)
- Equipment:
- 1.5–2 L pudding basin or mixing bowl (metal or glass), rounded
- Plastic wrap
- Small saucepan
- Sieve
- Rolling pin (optional, for flattening bread)
Instructions
- Prep the bowl. Lightly butter a 1.5–2 L rounded bowl, then line it fully with plastic wrap, leaving plenty of overhang.
This makes unmolding easy and clean.
- Cook the berries briefly. Add mixed berries, sugar, and lemon juice to a saucepan. Warm over medium heat for 3–5 minutes until the fruit releases juices and softens but still holds shape. Stir gently.
Remove from heat.
- Flavor the syrup. Stir in vanilla and liqueur if using. Taste the juices and adjust with a pinch more sugar or lemon. You want a bright, balanced syrup, not cloying.
- Strain to collect syrup. Pour the fruit through a sieve set over a bowl.
Reserve the fruit in one bowl and the vibrant syrup in another. Let both cool to lukewarm. You’ll use the syrup to stain the bread and to brush layers.
- Trim and shape the bread. Remove crusts and, if needed, lightly roll slices to make them thinner and more flexible.
Cut one slice into a neat circle to fit the very bottom center of your bowl.
- Line the bowl. Dip one side of the bottom circle lightly in syrup and place it, stained side down, in the base of the bowl. Then cut other slices into neat rectangles or triangles and line the sides, overlapping slightly and pressing together so there are no gaps. A tight, gap-free shell prevents leaks and keeps the bombe neat.
- Add the first fruit layer. Spoon in a layer of berries (about one-third). Drizzle 1–2 tablespoons of syrup over to moisten the bread shell where it meets the fruit, but don’t flood it.
- Create a bread “middle.” Add a layer of bread slices over the fruit, fitting pieces snugly.
Brush or spoon a little syrup over the bread to stain it. Press gently with your fingers to compact.
- Repeat layers. Add the second third of berries, then another thin bread layer with a touch of syrup. Finish with the final berries.
Keep at least 1 cm of space at the top for the final bread seal.
- Seal the top. Arrange a final layer of bread over the last fruit. Spoon a little syrup across the top so the bread picks up color. Fold over the plastic wrap to tightly close the bombe.
- Weigh it down. Place a small plate or flat lid directly on top of the wrapped pudding and weigh it with a can or jar. Chill for at least 6 hours, ideally overnight. The weight helps the bread absorb syrup and sets the shape.
- Unmold with confidence. Remove weights and unwrap the top.
Invert the bowl onto a serving plate and lift it off, using the plastic wrap edges to help release. Brush any pale patches with leftover syrup for a glossy, even finish.
- Garnish and serve. Decorate with fresh berries and mint. Serve in neat wedges with whipped cream or crème fraîche.
The contrast of tangy fruit and cool cream is chef’s kiss.
Keeping It Fresh
Store the pudding, covered, in the fridge for up to 3 days. The flavor actually deepens on day two as the syrup fully settles. If you notice any dry spots after cutting, dab with a little extra syrup before serving.
Avoid freezing; the bread texture can turn grainy and the fruit may weep excessively once thawed.
Health Benefits
- Berry power: Berries are rich in vitamin C, fiber, and antioxidants like anthocyanins, which support heart health and reduce inflammation.
- Less fat, big payoff: This dessert has minimal added fat compared to cream-heavy showstoppers, relying on fruit for richness and flavor.
- Controlled sweetness: You set the sugar level. Use ripe berries and reduce sugar if you prefer a tarter, brighter profile.
- Portion-friendly: It slices cleanly, which makes it easier to serve measured portions without crumbling or over-scooping.
Common Mistakes to Avoid
- Gaps in the bread shell: Even tiny spaces can lead to leaks or ragged edges. Overlap pieces slightly and press them together like shingles.
- Soaking bread too much: A quick dip or brush is enough.
If bread is drenched, it will tear and the shell may collapse.
- Skipping the weight: Without pressure, the bombe won’t set firmly. Use a plate and a can for that tight, sliceable structure.
- Overcooking the berries: Cook just until juicy. If you boil them down, the fruit gets mushy and the syrup turns jammy and dull.
- Rushing the chill: Six hours is the bare minimum.
Overnight gives the neatest slices and best flavor.
Variations You Can Try
- Stone fruit twist: Add sliced peaches or nectarines to the berry mix in late summer. Keep their pieces a bit larger for texture.
- Citrus lift: Add orange zest to the syrup and a splash of orange liqueur for a marmalade vibe.
- Herby brightness: Steep a few basil or mint leaves in the warm syrup, then remove before assembly for a subtle, fresh note.
- Brioche luxe: Swap white bread for brioche or challah for a richer, buttery shell that still holds beautifully.
- Chocolate-kissed: Fold a handful of mini dark chocolate chips into one fruit layer. The slight bitterness offsets the berries nicely.
- Dairy-free serve: Pair slices with coconut yogurt or a cashew cream if you’re avoiding dairy.
Can I Use Frozen Berries?
Yes.
Frozen berries work beautifully. Don’t thaw fully; add them to the pan and cook gently until they release juices. You may need a touch less sugar because freezing can make berries taste sharper, so taste and adjust.
What If I Don’t Have a Pudding Basin?
Use a medium mixing bowl or even a round-bottomed salad bowl.
The key is a smooth interior and enough depth to build layers. Line generously with plastic wrap so you can unmold cleanly.
How Do I Prevent a Pale, Patchy Dome?
Brush the outside with reserved syrup after unmolding. Also, stain the bread as you build—light dips or brushing ensure even color without soaking.
Can I Make It Alcohol-Free?
Absolutely.
Skip the liqueur and rely on lemon juice and vanilla. For a flavor boost, add a splash of pomegranate or cranberry juice to the syrup.
What Bread Works Best?
Soft, fresh white sandwich bread gives the smoothest finish. Brioche adds richness.
Avoid very seedy or wholegrain loaves—they can look uneven and resist staining.
How Far Ahead Can I Make It?
Make it up to 48 hours in advance. Keep it wrapped and weighted for the first 6–8 hours, then remove the weight and store covered until serving. Garnish right before presenting.
Final Thoughts
This Summer Berry Pudding Bombe feels fancy but leans on simple steps and everyday ingredients.
It’s colorful, sliceable, and reliably crowd-pleasing, whether you’re hosting a backyard lunch or a special celebration. Assemble ahead, flip with flair, and let those jewel-toned slices do the talking. Once you make it, you’ll have a new go-to showstopper in your back pocket.